"Hello, World" - or in the case of an embedded system "flash a LED" - is the first thing that most users try to do when getting started on a new hardware platform.
Skill Level
Simple - but you need to be comfortable using simple electronic components
Warning: While it is unlikely that you will damage or destroy your mangOH board following this tutorial, it IS possible to do so.
Check and double check all wiring connections before applying power, and if you are not sure get someone else to check your work as well before powering up the mangOH board!
Requirements
- mangOH Green DV3 or DV4 board. - Note this tutorial WON’T work with a DV2 board due to changes with the GPIO hardware between the DV2 and later board revisions.
- Renfell IoT Interface Card and 2.0mm jumpers (available from Linkwave Technologies in the UK and EU)
- Small 'breadboard' (such as this one from Sparkfun )
- 1 off Red LED
- 1 off 150 ohm resistor
- 2 off Arduino style Male-Female jumper wires [one BLUE, one BLACK] (such as these from Sparkfun )
- Legato 16.07 installed on a (Ubuntu) Linux development PC
- Basic familiarity with Linux
Setting up the hardware
IoT Card
Start with the Renfell IoT Interface card and lay it out with the IoT (edge) connector facing left and the 20 pin header facing to the right.
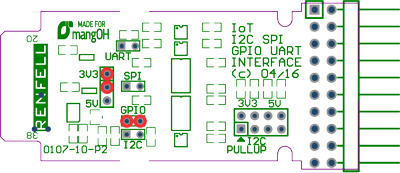
Configure the jumpers on the Renfell IoT card as shown in RED in Figure 1 below

Figure 1: IoT Card configuration
- Select 3V3 power - Jumper 3V3 to center pin
- Enable GPIO – Jumper header marked ‘GPIO’
Breadboard
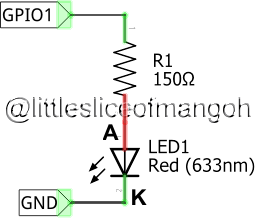
This tutorial is going to connect a Red LED (Light Emitting Diode) to GPIO1 in the IoT slot on the mangOH board so that the LED can be turned on and off under program control.
Figure 2 shows the schematic diagram for the LED circuit:

Figure 2: Breadboard schematic diagram
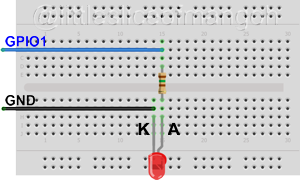
Figure 3 shows how to physically wire the breadboard

Figure 3: Breadboard layout
Note that the LED is polarized and must be inserted the correct way around. Here is an Instructable with some photos on how to identify the Anode (A) and Cathode (K) leads on a LED.
Mating the mangOH green, IoT card and breadboard
Warning: It is STRONGLY recommended that you power down the mangOH board before doing the following steps...
- insert the IoT Interface card into the center slot (IoT1) of the mangOH Green
using male to female jumpers, connect the breadboard to the Iot Interface card as follows:
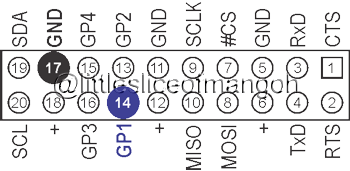
- Using a BLUE jumper connect Pin 1 of the 150R resistor on the breadboard to GP1 (pin 14) on the IoT card
- Using a BLACK jumper connect the cathode (K) of the LED on the breadboard to GND (pin 17) on the IoT card
Figure 4 shows the pinout looking into the connector on the IoT card with the required connections highlighted:

Figure 4: IoT Connector pin-out
Once connected, the MangOH Green and the Breadboard should be connected as shown in figure 5, below.
 Figure 5: Assembled mangOH Green, IoT Card and breadboard
Create the SimpleBlinky Application
Note: The code presented below has been built using a Ubuntu Linux distribution and tested on a mangOH Green DV3 board running Legato 16.07.
The sample application as presented here will not run either a mangOH Red or a FX30 as the support reMangOHService service application is not yet available for these platforms.
This tutorial is not an exercise in typing, so the source code as a command line (Makefile) application can be downloaded from here
Tip: It is suggested that you create a separate base directory for these tutorials so that they don't interfere with your other code. For the purposes of this tutorial, it is assumed that this base directory is a subdirectory under the user's home directory:
/home/developer/tutorials-16.07or as a shorthand
~/tutorials-16.07You can make this directory by opening a console (or command) window and typing the following commands:
cd ~
mkdir ~/tutorials-16.07
Download and unpack the .tgz file
- download the tgz file from here and save it to the tutorials directory (
~/tutorials-16.07) unpack the tgz file either using the archive manager or using the following commands in the console window:
cd ~/tutorials-16.07
tar -xvzf gettingstartedasimpleblinky.tgz
Build and install the application
Note: Before continuing, you have to have have installed Legato 16.07, AND run either the Legato shell or configured the enviroment variables to allow the build tools to run.
Either run the Legato shell:
cd ~/legato
source ./bin/legs
or configure the environment variables
cd ~/legato
. bin/configlegatoenv
Getting informational messages such as the following
No toolchain found for target 'ar7'.
Unable to find compatible cross-build toolchain for target 'ar7'.
No toolchain found for target 'ar86'.
Unable to find compatible cross-build toolchain for target 'ar86'.
is normal if you don't have the tools for the AR7 or AR86 processors installed, and these messages can be ignored.
This MUST be run every time that a new command window is opened to configure the build tools!
In this tutorial, all the heavy lifting to build and install the application is done using make and a custom Makefile. The make process encapsulates the complexity of the build process into a number of simple commands (called targets). make also makes decisions about what needs to be done to build the application to be installed on the target mangOH board, and the Makefile can even be configured to install the application onto the target mangOH board.
Build the application:
change to the source directory
cd ~/tutorials-16.07/asimpleblinkymakethe applicationmake targetthis will build an intermediate directory to put all the working files into, and build the .update file ready to load onto the mangOH board.
You can check that the .update file has built correctly by listing the contents of the directory and looking for the file
asimpleblinky.wp85.update
Install the application onto the target:
- Make sure that your development PC is plugged into the target mangOH board using USB and that:
- the mangOH board is powered on; and
the USB ethernet network is up
The network connection can be tested using the following command:
ping 192.168.2.2press
CTRL-Cto stop thepingoutput.If
pingtimes out or returns an error such asdestination host unreachable, make sure that the mangOH board is powered on and the USB network connection is 'up'.
Install the application onto the mangOH board (over the USB ethernet connection)
make installConnecting to a new mangOH board: If you have never connected this particular WP8548 based board to this PC, you may get an SSH prompt like this:
installing asimpleblinky.wp85.update to 192.168.2.2
Applying update from file 'asimpleblinky.wp85.update' to device at address '192.168.2.2'.
The authenticity of host '192.168.2.2 (192.168.2.2)' can't be established.
RSA key fingerprint is 01:23:45:67:89:ab:cd:ef:01:23:45:67:89:ab:cd:ef.
Are you sure you want to continue connecting (yes/no)?
Check IP address information presented and if you are satisfied that the target is genuine, accept the connection by following the prompts.
SSH Connection error: If you get an SSH error like this
@@@@@@@@@@@@@@@@@@@@@@@@@@@@@@@@@@@@@@@@@@@@@@@@@@@@@@@@@@@
@    WARNING: REMOTE HOST IDENTIFICATION HAS CHANGED!     @
@@@@@@@@@@@@@@@@@@@@@@@@@@@@@@@@@@@@@@@@@@@@@@@@@@@@@@@@@@@
IT IS POSSIBLE THAT SOMEONE IS DOING SOMETHING NASTY!
Someone could be eavesdropping on you right now (man-in-the-middle attack)!
It is also possible that a host key has just been changed.
The fingerprint for the RSA key sent by the remote host is
01:23:45:67:89:ab:cd:ef:01:23:45:67:89:ab:cd:ef.
Please contact your system administrator.
Add correct host key in /home/developer/.ssh/known_hosts to get rid of this message.
Offending RSA key in /home/developer/.ssh/known_hosts:10
  remove with: ssh-keygen -f "/home/developer/.ssh/known_hosts" -R 192.168.2.2
RSA host key for 192.168.2.2 has changed and you have requested strict checking.
Host key verification failed.
Update failed
@@@@@@@@@@@@@@@@@@@@@@@@@@@@@@@@@@@@@@@@@@@@@@@@@@@@@@@@@@@
@    WARNING: REMOTE HOST IDENTIFICATION HAS CHANGED!     @
@@@@@@@@@@@@@@@@@@@@@@@@@@@@@@@@@@@@@@@@@@@@@@@@@@@@@@@@@@@
IT IS POSSIBLE THAT SOMEONE IS DOING SOMETHING NASTY!
Someone could be eavesdropping on you right now (man-in-the-middle attack)!
It is also possible that a host key has just been changed.
The fingerprint for the RSA key sent by the remote host is
01:23:45:67:89:ab:cd:ef:01:23:45:67:89:ab:cd:ef.
Please contact your system administrator.
Add correct host key in /home/developer/.ssh/known_hosts to get rid of this message.
Offending RSA key in /home/developer/.ssh/known_hosts:10
  remove with: ssh-keygen -f "/home/developer/.ssh/known_hosts" -R 192.168.2.2
RSA host key for 192.168.2.2 has changed and you have requested strict checking.
Host key verification failed.
make: *** [install] Error 255
because you've had another WP8548 board connected via USB, use the following command to clear the SSH key:
make sshcleanand then follow the instructions above for connecting to a new mangOH board
Install the reMangOH helper service
This application uses a special helper service for the mangOH green to simplify access to the hardware and IoT slots on the mangOH Green. A copy of this service is provided in the tgz file that contains the application source code.
change to the reMangOH directory
cd ~/tutorials-16.07/reMangOHinstall the service onto the mangOH target using the tools provided by Legato
app install reMangOHService 192.168.2.2check the service is running on the mangOH target
app status reMangOHService 192.168.2.2which should return
[running] reMangOHService
Start the application on the mangOH target board
The application is not set to autostart on boot or installation, so it must be started before the LED will begin to blink. There are two different ways of starting the application on the mangOH target board:
From the development PC (using remote SSH commands to the target mangOH board):
make startFrom the mangOH target itself (you will need to be connected to the mangOH target board via a SSH console to use this method)
app start asimpleblinky
Troubleshooting
Congratulations! If everything has come together, you should now have a LED blinking on and off every half second. If it's not, here are a few things to check:
- go back over the hardware set and check the following:
- the LED is in the correct way (it is polarized and will only work one way)
- the connections between the breadboard and IoT card are correct (make sure that the resistor is connected to GP1 and the Cathode of the LED is connected to a Ground pin)
- check the software is running correctly
from the development PC, run the command
make statuswhich should report back the following
app status asimpleblinky 192.168.2.2
[running] asimpleblinky
if these report back:
[not installed]then the application is not installed on the target. See step 7, above.[stopped]then the application has not been started (or hasn't started correctly). See step 8, above
from the target mangOH board, run the command
app statusand look for the line containing
asimpleblinky- If there is no entry for
asimpleblinkythen the application is not installed on the target. See step 7, above. - If there is an entry for
asimpleblinkyand it says[stopped]then the application has not been started (or hasn't started correctly). See step 8, above
- If there is no entry for
